How to Install BASH Software on Your Windows 10 Computer?
Want to get Bash installed into your Windows 10 laptop or desktop? If your answer is yes, then you have landed on the right website.
Most people are aware that Windows 10 doesn’t support the Linux command line. But in this article, you will learn how to install BASH right into your device. This might be a bit complicated on Windows 10, but with the help of this article, you can easily install Bash on Windows 10. Here’s how to do that.
Step 1: Check the System Requirements Met with Your Device
You should have a 64-bit architecture processor for running BASH into your Windows 10. You should also have at least the 14393 or later version of Windows 10 installed on your device. To check your device compatibility, head to the Start Menu, and then search for “about your PC” in the search bar. Now tap on the icon that appears on the top of results.
Find the OS version information after clicking on the icon. If the Windows version is lower than 14393, then you can update your Windows over a fast network connection.
Step 2: Getting the Windows 10 Anniversary Edition
If your device has the Windows version newer than 14393, then you can skip this step as we are going to update the older version of Windows 10. Here’s how to get the Anniversary Windows 10 update:
- Open the internet browser on your device and then head to the “support.microsoft.com/en-gb/help/12387/windows-10-update-history” URL.
- Now hit the Get Update Now option.
- Your browser will download the Windows Update tool shortly.
Step 3: Download and Install the Windows 10 Update
Run the update tool that you just downloaded in the previous step. Let the Windows updated with the tool, and you may also see an update progress bar on the upper left side.
Grab a cup of coffee and sit quietly until the update completes. The device may restart several times during the Windows update process. You may need to wait more than 1 hour or so.
Step 4: Activating Developer Mode
Now the system is all ready to take the load of your Linux shell, but one more setting is required for that. You have to enable the Windows 10 Developer Mode because the BASH comes under developer functions. To turn on developer mode, follow the instructions mentioned below:
- Navigate Settings on your Windows 10.
- Head to the “Update & Security” option.
- On the new tab, which appears, go to the “For Developers” option located on the left of your screen.
- A list of multiple buttons will trigger, including the following options:
- Window store apps
- Sideload apps
- Developer mode
- You have to choose the “Developer Mode” option.
- A message will trigger saying that your device can be exposed to a security risk if you turn it on. Just press the “Yes” option to turn on the developer mode.
More To read
Step 5: Enabling Windows Subsystem for Linux
- Head to the Start Menu and then search for “Turn Windows Features” in the search bar.
- Choose the icon saying “Turn Windows Features On or Off.”
- Scroll downwards and then look for the “Windows Subsystem For Linux (Beta)” option. There is a box located next to it, and you have to tick on it.
- Now press the OK
By doing so, you can enable the Windows Subsystem for Linux feature on your PC.
Step 6: Activating Linux and Installing Bash
- We will activate Linux with the help of the “Powershell” program. To do so, first of all, open the Powershell command prompt. To open it, Head to the Start Menu and then search for it.
- Now when the Powershell icon appears, simply right click on it and then select the “Run as administrator” option.
- Powershell will trigger on the screen, and you will have to enter the “Enable-WindowsOptionalFeature -Online -FeatureName Microsoft-Windows-Subsystem-Linux” command in the Powershell window.
- If you have entered the right command in the Powershell window, then you will see the “PS C:\Windows\System32>” message on Powershell.
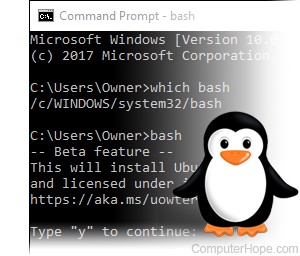
- Now type “bash” command.
- A message saying “Ubuntu on windows will be installed” appear on the screen.
- Now press the “Y” key of your keyboard to allow the Ubuntu installation on your device.
- You may see a prompt to create a new user for yourself, if that’s the case, then provide username and password of your choice.
Now the Ubuntu is successfully installed to your device. This Ubuntu can understand and react to the Windows file structure.
To launch the Bash in your device, open either the Command Prompt or Powershell and then simply type Bash and press the enter key. The service will be launched shortly after that.
Alex Smith a creative person who has been writing blogs and articles about cyber security. He writes about the latest updates regarding mcafee.com/activate and how it can improve the work experience of users. His articles have been published in many popular e-magazines, blogs and websites.


Comments
Post a Comment